
How to Plant a Germinated Seed? A Complete Step-by-Step Guide
A germinated seed is at one of the most delicate stages at the beginning of the growing process. The seed has already developed its first root, but it is still highly susceptible to damage, overwatering, and mistakes during planting. Fortunately, transferring a germinated seed into soil is not difficult — you simply need to handle it carefully and provide the right conditions.
In this guide, you will learn how to properly plant a germinated seed in soil, how deep to plant it, which direction the root should face, and what to do during the first few days after planting.
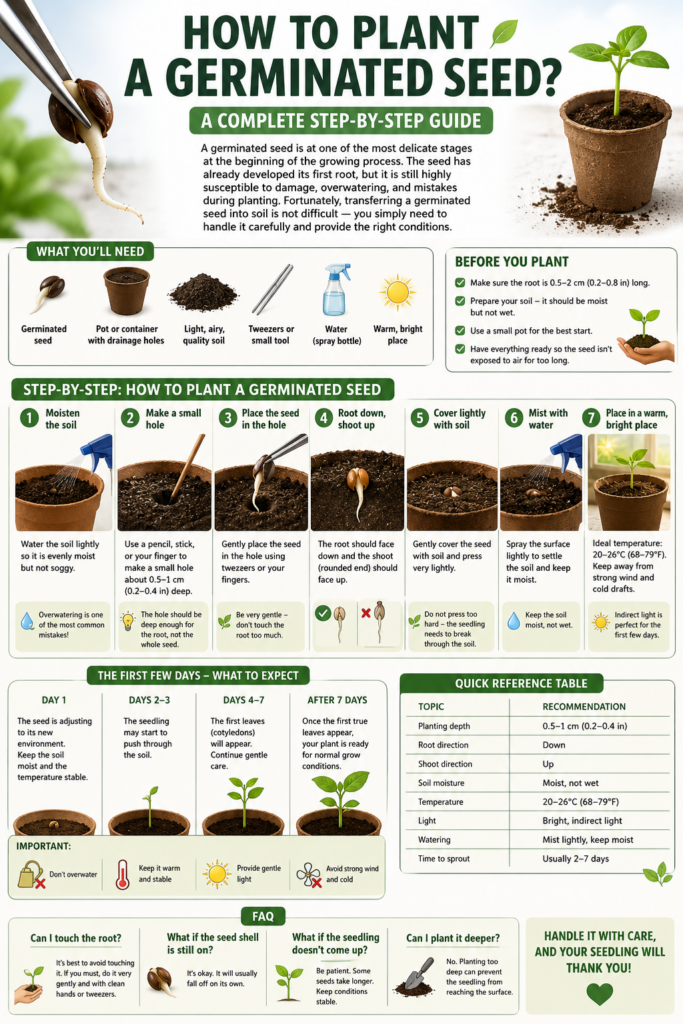
Table of Contents
- When Is a Germinated Seed Ready to Be Planted?
- What Do You Need to Plant a Germinated Seed?
- How to Prepare the Soil Before Planting
- How Deep Should You Plant a Germinated Seed?
- Which Direction Should You Plant a Germinated Seed?
- How to Plant a Germinated Seed Step by Step
- Should You Water Immediately After Planting?
- What Should You Do After Planting a Germinated Seed?
- The Most Common Mistakes When Planting Germinated Seeds
- FAQ – Frequently Asked Questions
When Is a Germinated Seed Ready to Be Planted?
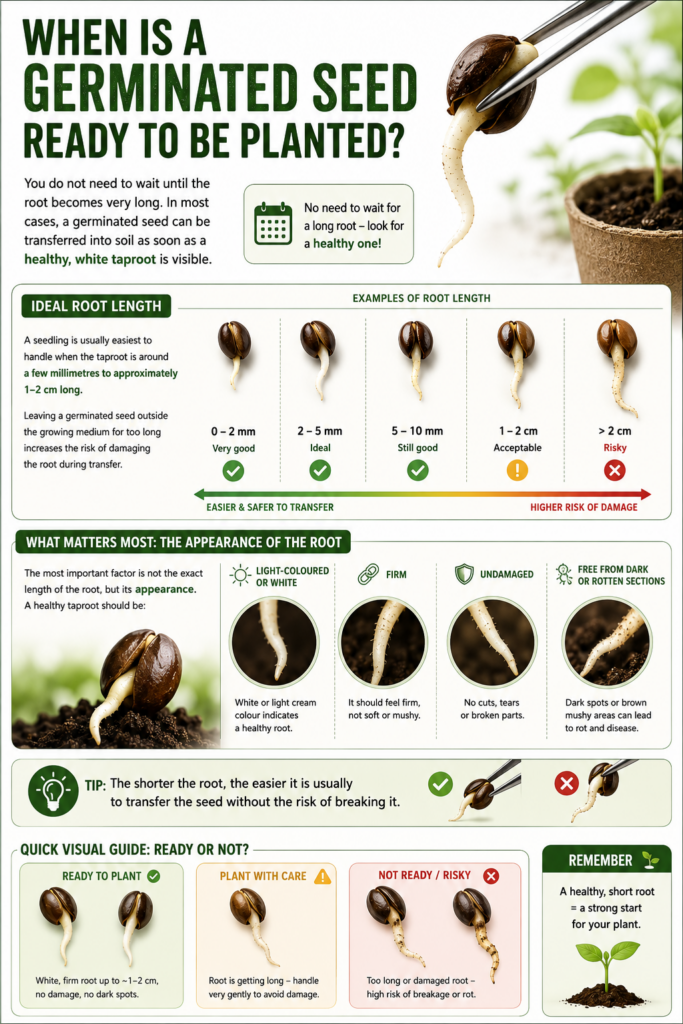
You do not need to wait until the root becomes very long. In most cases, a germinated seed can be transferred into soil as soon as a healthy, white taproot is visible.
A seedling is usually easiest to handle when the taproot is around a few millimetres to approximately 1–2 cm long. Leaving a germinated seed outside the growing medium for too long increases the risk of damaging the root during transfer.
However, the most important factor is not the exact length of the root, but its appearance. A healthy taproot should be:
- light-coloured or white,
- firm,
- undamaged,
- free from dark or rotten sections.
Tip: The shorter the root, the easier it is usually to transfer the seed without the risk of breaking it.
What Do You Need?
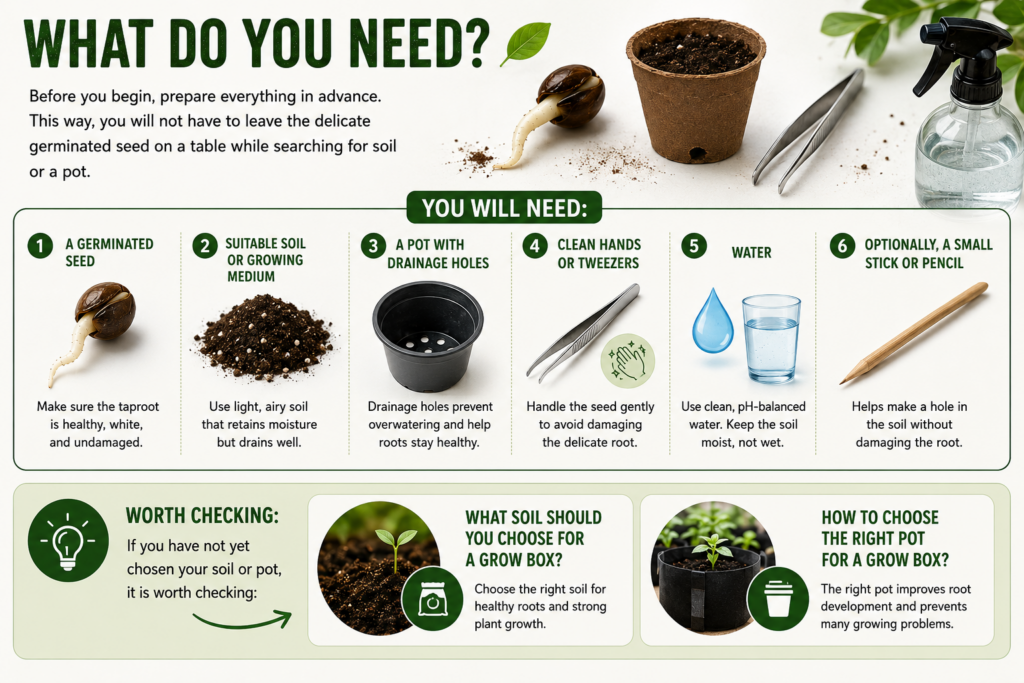
Before you begin, prepare everything in advance. This way, you will not have to leave the delicate germinated seed on a table while searching for soil or a pot.
You will need:
- a germinated seed,
- suitable soil or growing medium,
- a pot with drainage holes,
- clean hands or tweezers,
- water,
- optionally, a small stick or pencil for making a hole in the soil.
If you have not yet chosen your soil or pot, it is worth checking:
- What Soil Should You Choose for a Grow Box?
- How to Choose the Right Pot for a Grow Box?
How to Prepare the Soil Before Planting
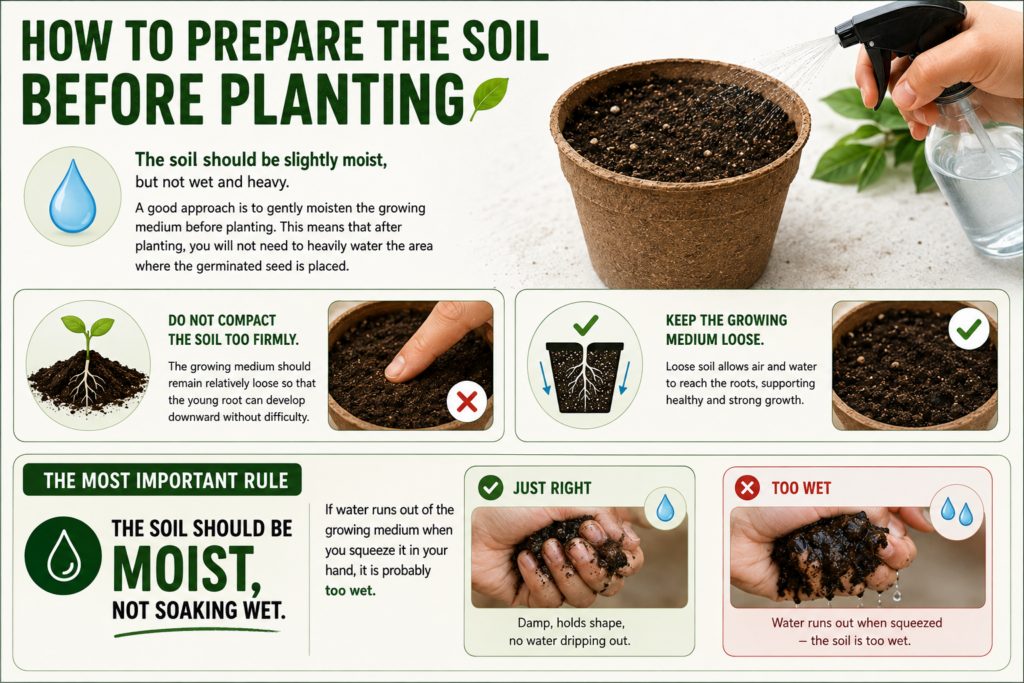
The soil should be slightly moist, but not wet and heavy.
A good approach is to gently moisten the growing medium before planting. This means that after planting, you will not need to heavily water the area where the germinated seed is placed.
Do not compact the soil too firmly. The growing medium should remain relatively loose so that the young root can develop downward without difficulty.
The Most Important Rule
The soil should be moist, not soaking wet.
If water runs out of the growing medium when you squeeze it in your hand, it is probably too wet.
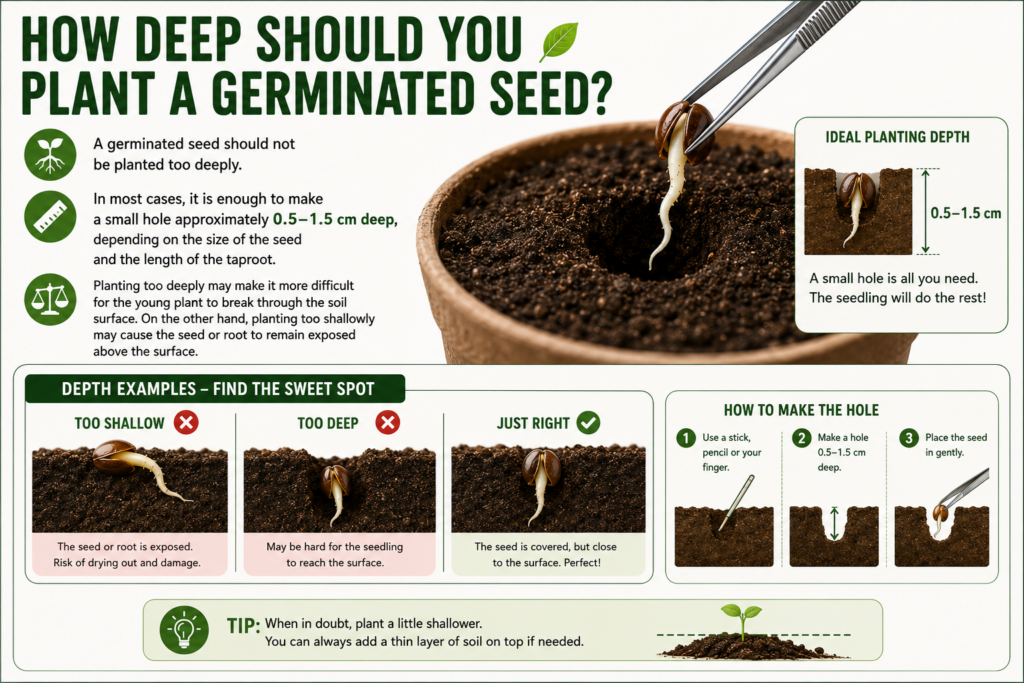
How Deep Should You Plant a Germinated Seed?
A germinated seed should not be planted too deeply.
In most cases, it is enough to make a small hole approximately 0.5–1.5 cm deep, depending on the size of the seed and the length of the taproot.
Planting too deeply may make it more difficult for the young plant to break through the soil surface. On the other hand, planting too shallowly may cause the seed or root to remain exposed above the surface.
| Stage | What to Do | What to Watch Out For |
|---|---|---|
| Preparing the soil | Lightly moisten the growing medium | Do not turn the soil into mud |
| Making the hole | Make a small hole in the soil | Do not plant too deeply |
| Transferring | Gently hold the seed | Do not touch or squeeze the root |
| Positioning | Point the root downward | Do not break the root |
| Covering | Lightly cover with soil | Do not compact the growing medium |
| Watering | Gently moisten the area around the seed | Do not soak the entire pot |
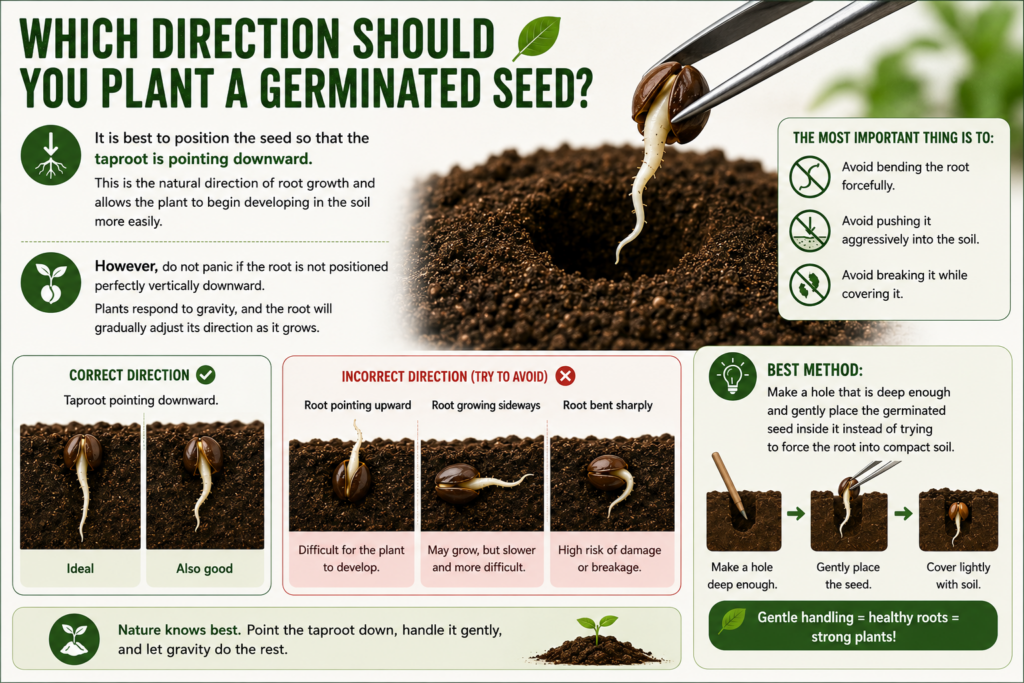
Which Direction Should You Plant a Germinated Seed?
It is best to position the seed so that the taproot is pointing downward.
This is the natural direction of root growth and allows the plant to begin developing in the soil more easily.
However, do not panic if the root is not positioned perfectly vertically downward. Plants respond to gravity, and the root will gradually adjust its direction as it grows.
The most important thing is to:
- avoid bending the root forcefully,
- avoid pushing it aggressively into the soil,
- avoid breaking it while covering it.
Best method: Make a hole that is deep enough and gently place the germinated seed inside it instead of trying to force the root into compact soil.
How to Plant a Germinated Seed Step by Step
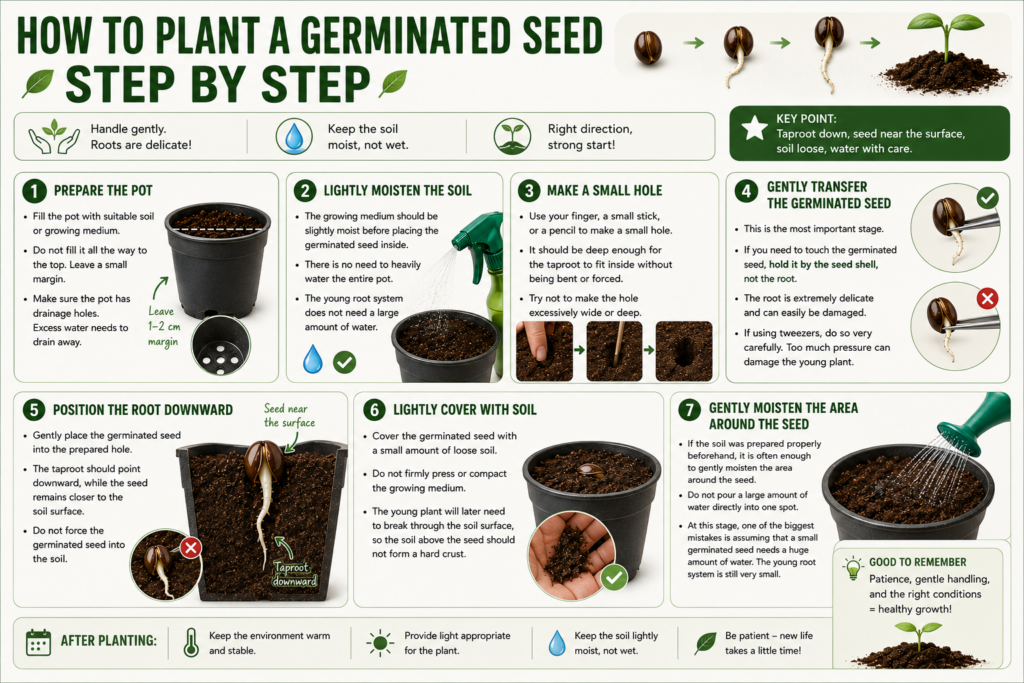
Step 1: Prepare the Pot
Fill the pot with suitable soil or growing medium.
Do not fill it all the way to the top. Leave a small margin to make watering easier later.
Also, make sure that the pot has drainage holes. Excess water needs to be able to drain away.
Step 2: Lightly Moisten the Soil
The growing medium should be slightly moist before placing the germinated seed inside.
There is no need to heavily water the entire pot. Especially at the beginning, the young root system does not need a large amount of water.
Step 3: Make a Small Hole
Use your finger, a small stick, or a pencil to make a small hole.
It should be deep enough for the taproot to fit inside without being bent or forced.
Try not to make the hole excessively wide or deep.
Step 4: Gently Transfer the Germinated Seed
This is the most important stage.
If you need to touch the germinated seed, it is best to hold it by the seed shell, rather than the root.
The root is extremely delicate and can easily be damaged.
If you are using tweezers, do so very carefully. Applying too much pressure can damage the young plant.
Step 5: Position the Root Downward
Gently place the germinated seed into the prepared hole.
The taproot should point downward, while the seed itself should remain closer to the soil surface.
Do not force the germinated seed into the soil.
Step 6: Lightly Cover with Soil
Cover the germinated seed with a small amount of loose soil.
Do not firmly press or compact the growing medium with your hand.
The young plant will later need to break through the soil surface, so the soil above the seed should not form a hard crust.
Step 7: Gently Moisten the Area Around the Seed
If the soil was prepared properly beforehand, it is often enough to gently moisten the area around the seed.
Do not pour a large amount of water directly into one spot.
At this stage, one of the biggest mistakes is assuming that a small germinated seed needs a huge amount of water. The young root system is still very small.
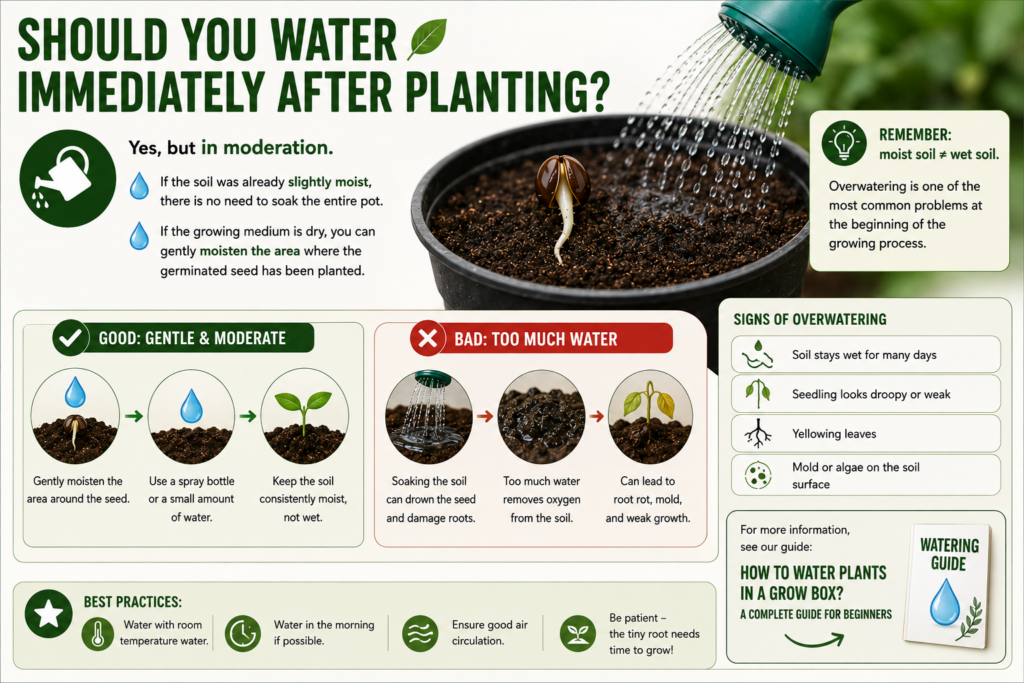
Should You Water Immediately After Planting?
Yes, but in moderation.
If the soil was already slightly moist, there is no need to soak the entire pot.
If the growing medium is dry, you can gently moisten the area where the germinated seed has been planted.
Remember:
moist soil ≠ wet soil.
Overwatering is one of the most common problems at the beginning of the growing process.
For more information, see our guide:
How to Water Plants in a Grow Box? A Complete Guide for Beginners
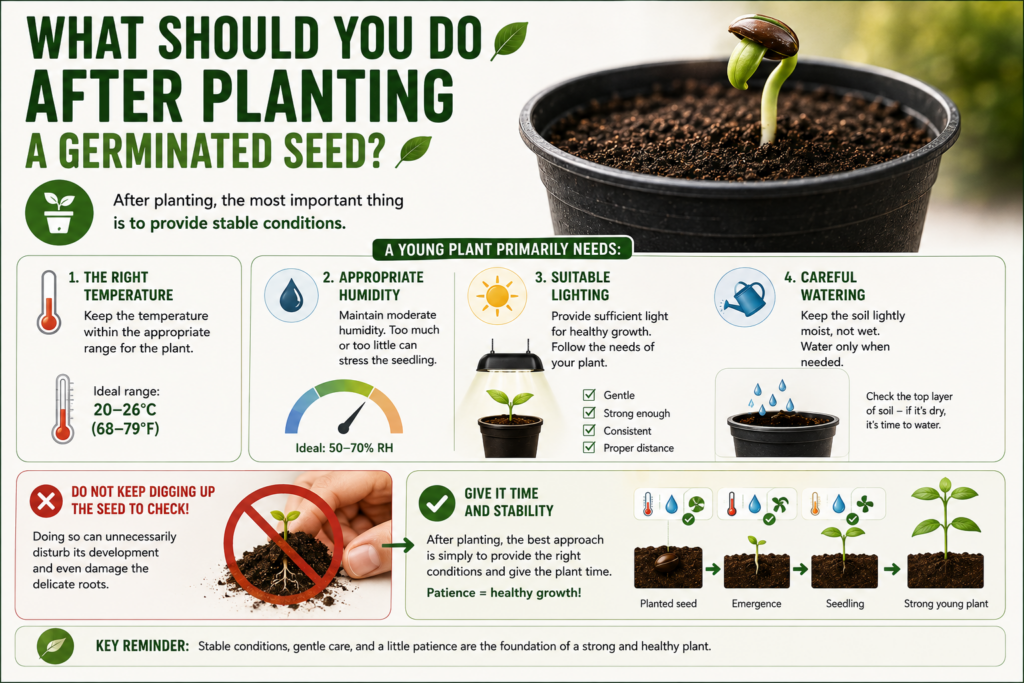
What Should You Do After Planting a Germinated Seed?
After planting, the most important thing is to provide stable conditions.
A young plant primarily needs:
- the right temperature,
- appropriate humidity,
- suitable lighting,
- careful watering.
There is no need to keep digging up the seed to check whether it is growing. Doing so can unnecessarily disturb its development.
After planting, the best approach is simply to provide the right conditions and give the plant time.
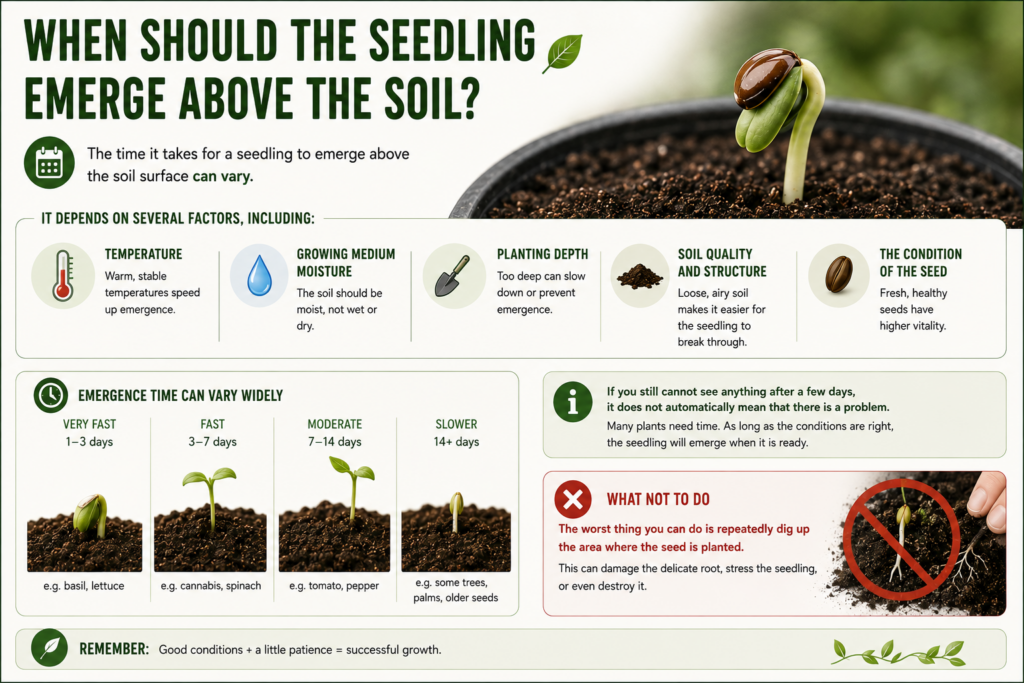
When Should the Seedling Emerge Above the Soil?
The time it takes for a seedling to emerge above the soil surface can vary.
It depends on several factors, including:
- temperature,
- growing medium moisture,
- planting depth,
- soil quality and structure,
- the condition of the seed.
Some plants emerge above the soil quickly, while others need more time.
If you still cannot see anything after a few days, it does not automatically mean that there is a problem.
The worst thing you can do is repeatedly dig up the area where the seed is planted.
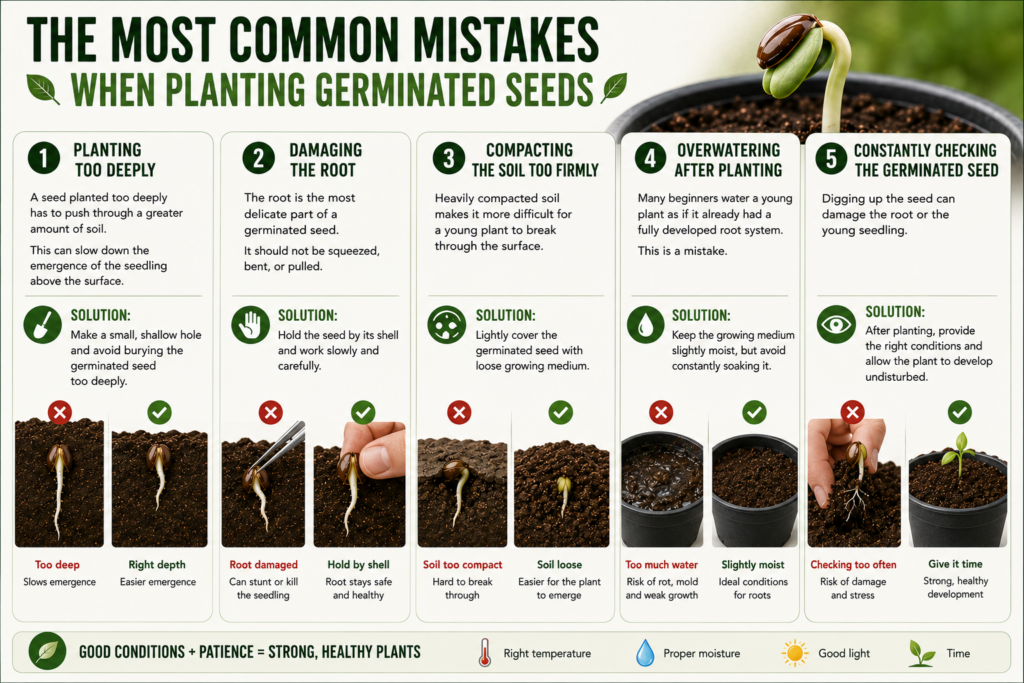
The Most Common Mistakes When Planting Germinated Seeds
1. Planting Too Deeply
A seed planted too deeply has to push through a greater amount of soil.
This can slow down the emergence of the seedling above the surface.
Solution:
Make a small, shallow hole and avoid burying the germinated seed too deeply.
2. Damaging the Root
The root is the most delicate part of a germinated seed.
It should not be squeezed, bent, or pulled.
Solution:
Hold the seed by its shell and work slowly and carefully.
3. Compacting the Soil Too Firmly
Heavily compacted soil makes it more difficult for a young plant to break through the surface.
Solution:
Lightly cover the germinated seed with loose growing medium.
4. Overwatering After Planting
Many beginners water a young plant as if it already had a fully developed root system.
This is a mistake.
Solution:
Keep the growing medium slightly moist, but avoid constantly soaking it.
5. Constantly Checking the Germinated Seed
Digging up the seed can damage the root or the young seedling.
Solution:
After planting, provide the right conditions and allow the plant to develop undisturbed.
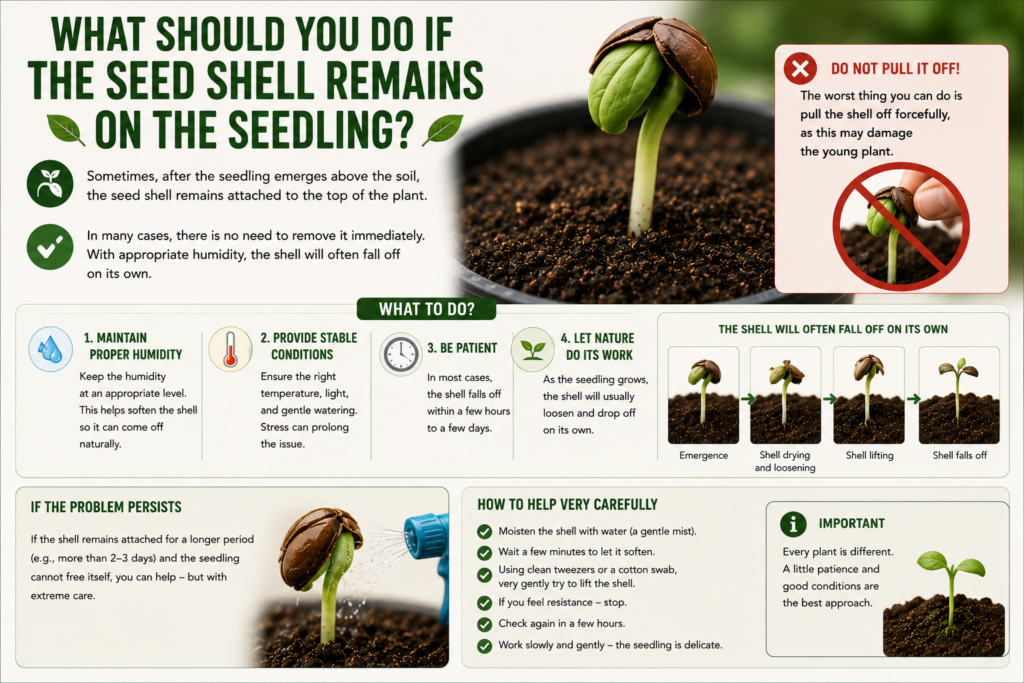
What Should You Do If the Seed Shell Remains on the Seedling?
Sometimes, after the seedling emerges above the soil, the seed shell remains attached to the top of the plant.
In many cases, there is no need to remove it immediately. With appropriate humidity, the shell will often fall off on its own.
The worst thing you can do is pull the shell off forcefully, as this may damage the young plant.
If the problem persists for a longer period, it should be handled very carefully.
Summary – How to Properly Plant a Germinated Seed
Planting a germinated seed is a simple process if you follow a few basic rules:
- Prepare light, slightly moist soil or growing medium.
- Make a small hole.
- Gently transfer the germinated seed.
- Do not touch or squeeze the root.
- Position the root so that it points downward.
- Lightly cover the germinated seed with soil.
- Do not compact the growing medium too firmly.
- Do not overwater the pot.
- Provide stable growing conditions.
- Give the plant time and do not dig it up every few hours.
The most important rule is:
The less you unnecessarily handle a delicate germinated seed, the better.
FAQ – How to Plant Germinated Seeds
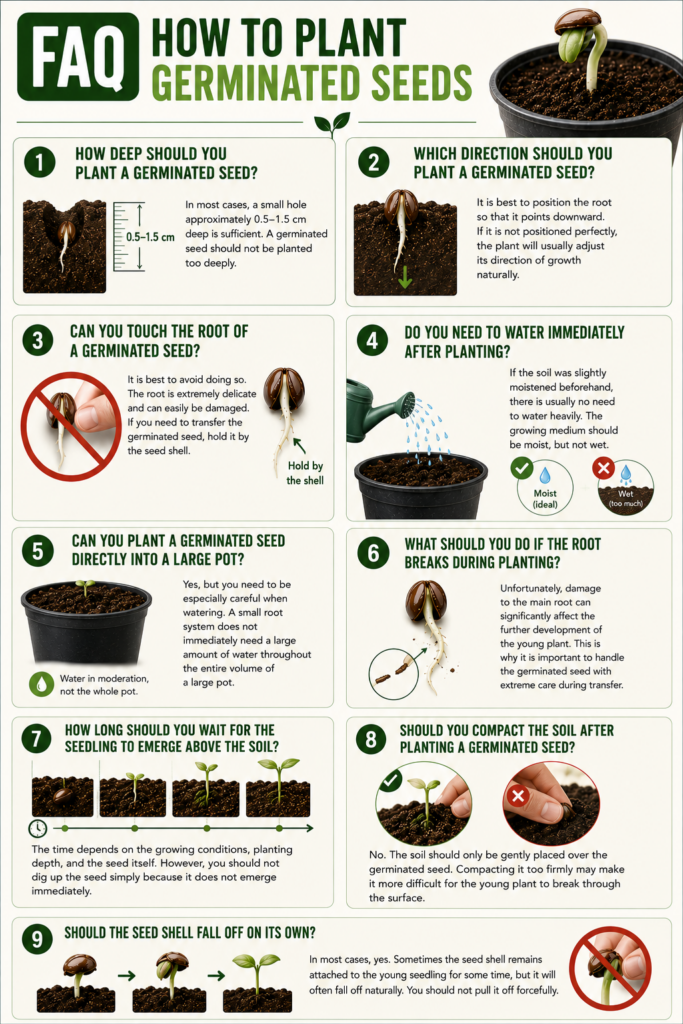
How Deep Should You Plant a Germinated Seed?
In most cases, a small hole approximately 0.5–1.5 cm deep is sufficient. A germinated seed should not be planted too deeply.
Which Direction Should You Plant a Germinated Seed?
It is best to position the root so that it points downward. If it is not positioned perfectly, the plant will usually adjust its direction of growth naturally.
Can You Touch the Root of a Germinated Seed?
It is best to avoid doing so. The root is extremely delicate and can easily be damaged. If you need to transfer the germinated seed, hold it by the seed shell.
Do You Need to Water Immediately After Planting?
If the soil was slightly moistened beforehand, there is usually no need to water heavily. The growing medium should be moist, but not wet.
Can You Plant a Germinated Seed Directly into a Large Pot?
Yes, but you need to be especially careful when watering. A small root system does not immediately need a large amount of water throughout the entire volume of a large pot.
What Should You Do If the Root Breaks During Planting?
Unfortunately, damage to the main root can significantly affect the further development of the young plant. This is why it is important to handle the germinated seed with extreme care during transfer.
How Long Should You Wait for the Seedling to Emerge Above the Soil?
The time depends on the growing conditions, planting depth, and the seed itself. However, you should not dig up the seed simply because it does not emerge immediately.
Should You Compact the Soil After Planting a Germinated Seed?
No. The soil should only be gently placed over the germinated seed. Compacting it too firmly may make it more difficult for the young plant to break through the surface.
Should the Seed Shell Fall Off on Its Own?
In most cases, yes. Sometimes the seed shell remains attached to the young seedling for some time, but it will often fall off naturally. You should not pull it off forcefully.
Check Out Our Other Guides
If you are still setting up your grow tent or looking to improve your growing conditions, be sure to explore our other guides as well: